How to Make a Blog Content Calendar in Google Drive
Just Bee’s 3rd anniversary is coming up so soon!! (Psst — it’s on Monday! Watch for a fun giveaway coming then!) Three whole years of taking this blogging thing seriously. That sounds like a lot of time! And it has been a lot. It has involved a lot of hard work, photo shoots, content planning and writing, collaboration efforts, and priority balancing! To celebrate this blogging milestone, I’m sharing some posts this month that are more geared toward blogging specifics!
RELATED READING: 9 Ways to Take Your Blog More Seriously
As I mentioned in #5 of my post on 9 ways to take your blog more seriously, I love utilizing an editorial calendar for my blog! Does this mean that I absolutely MUST get that post up that day, or else? Definitely not! (Unless it’s a sponsored post with an agreed-upon deadline.) I don’t punish myself if something comes up and I can’t get that post done. I’d rather not have a post go up, rather than a post that looks haphazardly thrown together without much thought. But just having a content calendar helps me immensely.

People have varying opinions on this, but I personally love the structure and guidance that a content calendar gives me. Having an editorial calendar brings clarity and focus to your blogging life, especially if you’re working on taking your blog more seriously. My editorial calendar also makes sure I’m consistently posting and rotating between topics.
A while ago, I started a new system: I keep my editorial calendar for Just Bee in my blog account’s Google Drive. It has been working really well for me, so today I wanted to share with you how I actually go about making my content calendar! This post is more of the logistical side of setting up an editorial calendar.
(For help on brainstorming blog post ideas and finding inspiration, you can access a free detailed Blogging Inspiration Workbook below!)
Within a Google email account, there are tons of awesome options for creating documents. We actually use Google Drive all the time in our elementary school, and enter a lot of data into spreadsheets via Google Drive. I’ve gained a lot of experience in working with Google Drive these past 4 years of teaching, and I’m grateful for that because these skills are transferable and applicable to blogging!
What’s neat about Google Docs and items you create within Google Drive is the fact that you can add contributors as well as access the documents anytime, anywhere. While you may not use the “add contributors” option for your editorial calendar (I don’t, since I’m the sole author of this blog), you’ll definitely love the fact that you can just log into your Google account from anywhere. For me personally, I like that I can access my content calendar securely whenever I log into my account, without worrying about finding a Word document or misplacing a paper copy.
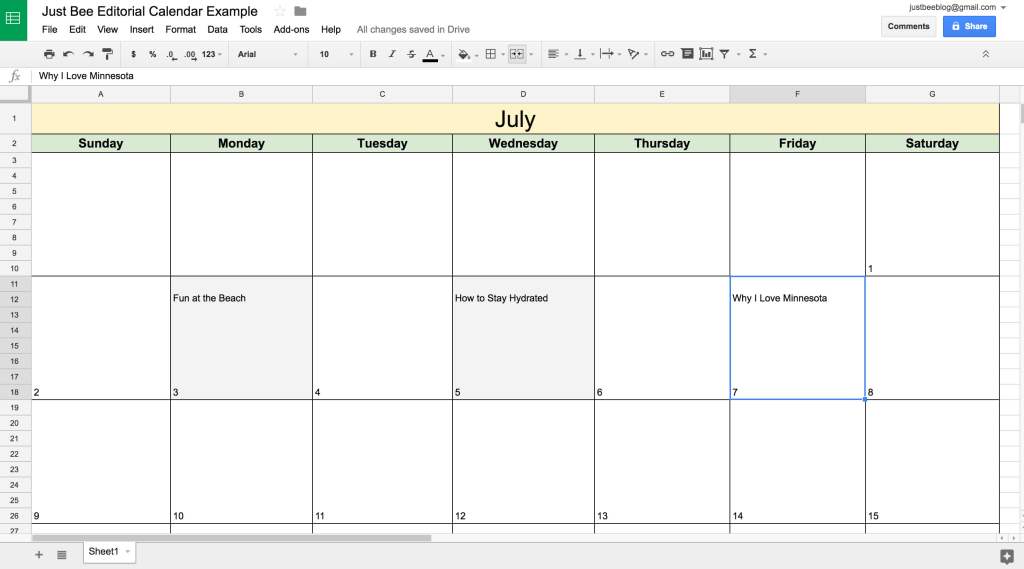
This is what my content calendar looked like for the month of June this year:

Let’s jump right in! Here’s how I go about this whole content calendar process:
How I Create My Blog Editorial Calendar in Google Drive:
1 // Create the spreadsheet itself!
Open up your Google Drive and Create a New Google Sheet. (You’ll need to have a Gmail account to do this.) Name it something that you’ll know right away is your content calendar. Mine is just called “Just Bee Editorial Calendar.”

2 // Label the month!
Highlight cells A1 through G1 horizontally. In the “Select Merge Type” icon in your toolbar, click “Merge Horizontally.”
Type the name of the month. Then you can center that text and play around with the color of that section and the font size. I like to have the name of the month in size 24 font.
I also adjusted the width of each column so that the entire calendar is larger, taking up almost my whole screen when I have it open. I find it easier to work with that way.

3 // Make the days of the week!
Highlight cells A2 through G2 horizontally. In the “Borders” icon in your toolbar, click the option that gives each cell a border.
Type the day of the week in each cell. Then I like to highlight them all once again, center them, bold them, and make them size 13 font.


4 // Now it’s time to make the actual boxes for each day of the month!
Highlight cells A3 through A10 vertically. Merge those together like you did earlier, but this time click “Merge Vertically.” Use the “Borders” icon again to give the cell a border.
Now you’ve got a nice square. Here’s the fun part: Copy & Paste that cell a bunch of times until you have enough boxes for each day of the month.
Type the date into each box. I would then select all of the cells and under “Text Alignment,” select “Left Alignment.” (That’s so your dates won’t look weird once you start entering more text into some of the boxes.)
Congrats! Your calendar is technically done and all set up at this point!

5 // To insert your content ideas into the calendar:
Double-click on the cell you want to add text to. Then, what I do on my Mac is I click to the left of the number, and hit “Command-Enter” 8 times, then I click at the top and type my text.
(I know this part sounds complicated, but it’s not bad. It’s just the specific method I use because I like how it looks once the text gets situated in the box!)

6 // To color-code the calendar:
I use a little color coding (nothing too complex) to manage my calendar. I just like to mark whether or not a post has been written and scheduled.
When I’ve finished a particular post, I go into my content calendar, select that day, and choose the fill color. I just use the very lightest gray option (it’s called Light Gray 3).
This alerts me as to which posts still need to be written that week or month. I like that I can determine what needs to get done with just one quick glance! 🙂

7 // To make additional calendars for future months:
First, make sure that every month’s tab is clearly labeled at the bottom of the screen: Just double-click on the tab at the bottom of your spreadsheet and type the name of that month into the tab, and hit Enter.

When you want to add an additional month, simply go to the bottom of your spreadsheet and click the tiny dropdown arrow on your current calendar tab. Click “Duplicate.”
A new tab with the same exact calendar will appear. Now all you have to do is rename that month as the correct month in the tab, and then go into the actual calendar and tweak the month’s name and the numeric dates.

That’s it, friends! It’s a great little system that I rely on. Hopefully this tutorial was helpful to you, and that your new content calendar will ensure you have some solid ideas to lean on! 🙂

PS – Now that your calendar is all set up, don’t forget to fill it with all of your amazing content ideas! If you need help brainstorming, I’ve got a great resources for you!
I used to do this very thing as well! I liked it too because I could download the app and access and write up ideas from my phone too. Your calendar is prettier than mine ever was though 🙂
I just found a widget on wordpress that is free and is a drag and drop editorial calender (it will also change the draft and scheduled post dates for you when you move it) which is the only reason I stopped using it. The widget is called “Editorial Calendar” and is accessible under the same section in your WP dashboard as posts.
Thanks for sharing, Autumn! It’s neat that there’s a widget now that helps with an editorial calendar, too! 🙂 Very cool!