DIY “Frozen” Themed Sensory Bottle
Sophie and I have really gotten into sensory activities lately! It all started when I picked the date to officially begin potty training. With the method we were using, I knew we’d have to stay home for potentially days on end, so I wanted to have fun new activities and projects to do with my daughter!

Side note: I’ve heard other parents remark that potty training times can really help you reconnect and bond with your busy toddler all over again, and I can relate. I felt like Sophie and I got some really intentional, sweet times together in the midst of all of the potty training…newness! 🙂
Anyway, back to the sensory activities: I’ve known about sensory bottles for forever, but I’d never made one with or for my daughter. There are countless recipes and sensory bottle crafts out there; however, I wanted to do a fresh spin on a sensory bottle by incorporating one of Sophie’s favorite things: the movie “Frozen!” 🙂 Sophie loves “Frozen” – the songs, the characters, and dressing up like Elsa – not to mention the fact that it’s a totally Scandinavian movie! (I married into a Scandinavian family – hence my children’s names, etc.!)

“Frozen” is SUCH a popular movie right now – with the second “Frozen” movie out, the marketing for all things “Frozen” has really taken off! We’ve seen this in everything from playground balls to fruit snacks to canned soup! And little girls everywhere seem to be asking for “Frozen” birthday parties! (I wouldn’t be too surprised if that’s what Sophie requests next October!) So, I thought, why not go with the momentum of the “Frozen” craze and make a special sensory bottle with Sophie that follows the theme?
This “Frozen” themed sensory bottle incorporates the whole color scheme of the film, complete with sparkles, glitter, and beautiful snowflake sequins! If you know a little girl who loves “Frozen,” then you will love making this sensory bottle together! (This is great practice with measuring and pouring. While it can get messy since you’re working with glitter, I’ve found that it’s pretty manageable with tight supervision, and a little mess is often worth the squeals of delight!)

DIY “Frozen” Themed Sensory Bottle
What You Need:

- A 12-oz. plastic juice bottle (this is the exact kind I bought – I purchased a set of them because I knew I’d be making more sensory bottles)
- Clear Elmer’s glue (be sure to get clear – I almost accidentally ordered white at first!)
- Super glue
- Glitter – various shades of blue, silver, purple, and even white work well. (Specifically, we used a fine white iridescent glitter, a chunkier teal-colored glitter, and a chunkier purply glitter.)


- Snowflake sequins (these are the ones I bought – this is what really adds the special “Frozen” touch)
- Water

What to Do:
First, add 1 cup of water to the bottle.
Next, add 1/2 tsp. snowflake sequins. (I initially did 1/2 tsp. but then Sophie really wanted to add another 1/2 tsp., which ended up looking great!)

Then add 1/8 tsp. each of glitter. (Shades of blue, silver, purple, and white are great – and it’s nice to mix glitter varieties that are both fine and chunkier.)

Fill the rest of the bottle up to the top with the clear Elmer’s glue.
Before putting the bottle cap back on, line the inside of the cap and the outside top edge of the bottle with super glue. Then screw the cap back on tightly. The super glue will help prevent your toddler from opening up a bottle full of glue and glitter water inside your house. 🙂
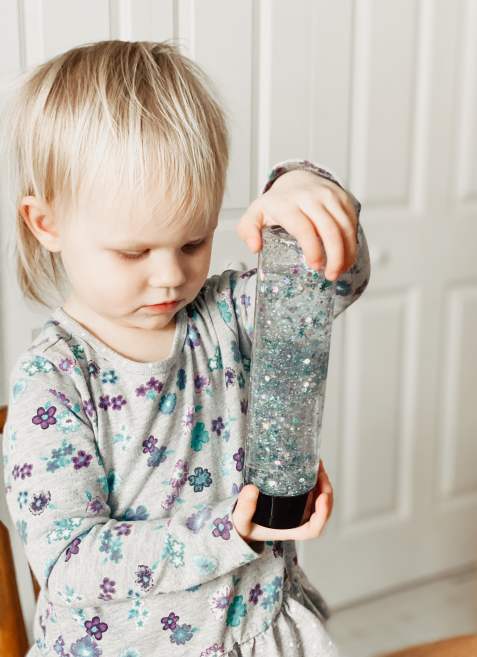
That’s it! Now tilt the bottle back and forth to watch a “Let It Go”-esque snowstorm swirl around inside! You and your child will love it!

These sensory bottles sure are mesmerizing to watch! I can totally see why some educators create “Calm Down” bottles – there’s something so peaceful about watching the glitter swirl around slowly and finally settle again. This “Frozen” bottle would be a great craft to make at a birthday party, sleepover, or just on a Saturday morning as a fun family activity!

If you end up making this craft, please tag me on Instagram (@hannahbeeolson). I’d absolutely love to see your creations!

To see more of our day-to-day life – the big updates as well as the little joyful moments with two kids – make sure you’re following me on Instagram! And feel free to follow this blog over on Facebook as well. I love sharing about all things motherhood, homemaking, and more! Thank you for reading along!
